Yeah, I know. I haven’t even finished blogging about the build of the 3D printer. I do want to add more about that, but it’s proving very difficult to do more than 24 hours after I did it. I may be doing some re-wiring on it to clean things up soon and that will make it easier to remember the gotchas I ran into. The 3D printer has been working great for me – a few minor issues now and then but is overall really working better than I had expected. So the past week I’ve had it busy working on parts for my next project. I estimate I still have around 35 hours of printing (give or take 10 hours) before I can move onto the next stage of this project but here’s the start of my attempt at building a CNC machine.
diy
11
Jan 16
Folger Tech 2020 Prusa i3 – The Build – Part 1
 Ok, this is going to be a bit more text heavy than I had wanted. But once I got going I forgot to stop for photos and I basically had one day that I could dedicate to the project with minimal interruptions so I just dug in and focused on the build instead of trying to really document the build.
Since then I’ve been having so much fun printing things that I haven’t found the time to write up this post. But I’m wanting to talk about the stuff I’ve been printing and feel like if I do that I’ll never get to this post. So before I forget all this it’s time to put it down for posterity and to help anyone else who’s building one of these “Kits”.
04
Jan 16
First 3D part from scratch.
 So I’ve been printing with the new Folger Tech 2020 Prusa i3 for about a week now and it’s going great. But so far I’ve only printed parts off thingiverse or other sources. Mostly little figurines for my daughter or parts to upgrade the printer. I’ve learned a LOT and have a number of posts planned about it all. But I’m jumping this one out of order because I can’t wait to share it. It’s the first part I designed and printed myself instead of just finding a design someone else already made. Continue reading →
31
Dec 15
Jason finally gets to try 3D printing.
So I’ve been interested in 3D printing for a long time. I’ve been seriously considering making a 3D printer for at least 10 years, but haven’t felt the price is worth the quality of prints they can deliver. I still think the price of commercial 3D printers is ridiculous for the speed/quality they deliver…but kits have reached a point where I think the price is low enough and the quality high enough that I started seriously getting interested.
16
Mar 10
Time for a new window
The screen never fit right in our dining room window, so I figured we should replace it. Read more for the photos.
10
Mar 10
CBG #2
Ok, so I promised a write up about building my second Cigar Box Guitar. I have a feeling it’s going to go a bit long so I may have to split it up into a couple of updates. But hey, at least that will give me an excuse to keep updates coming for a bit.
So here it goes, a bit of background and then the first steps of building my second cigar box guitar:

23
Feb 10
One more time
Ok, I’m still working on the article about building CBG#2:

But it’s the last day of the contest so I’ve got to try one more entry:
How to build a cigar box guitar – Free Plans at www.cigarboxnation.com.
30
Sep 08
New Skill
Ok, I know I’ve promised a couple of people a weekend update. It’s going to be a bit longer…it’s really not worth the wait…but I don’t have ANY photos to go with it. And since the whole point of the weekend was photography that just doesn’t seem right. The chemicals are cooling right now so I can process the film I shot and Amy will hopefully give me her memory card tonight. So this is just a place holder post.
The reason for the placeholder? I added a new skill to my resume just now. Camera repair! I recently bought a Bronica ETRS off ebay for $45. The camera is gorgeous, looks like it’s been in it’s original box it’s whole life. But – something was wrong. I could remove the film back with the darkslide out…and the shutter wouldn’t release. Not wanting to make it any worse but now having everything except a body I placed another order, this time to KEH, for a new body…and while I was at it a $10 “ugly” finder, a $10 “ugly” speed grip and a $30 “Bargain” 150mm lens to go with the $50 “Bargain” body.
The new body from KEH works great. I found that my $10 ebay special film back sometimes skips frames…but for $10…what are ya going to do. I’ll just keep my eyes open for a deal on a back in better condition…I want 2-3 more anyway.
So tonight with the original and much nicer looking but locked up body sitting on my desk teasing me I figured “What the heck”. It’s broken already…let’s see what’s wrong. Working the winder and various levers and catchs I thought I had a pretty good idea what may be wrong with it. There was one lever that appeared to be behind something it should have been in front of….it was part of the lens release mechanism but seemed to be connected to the film back detection levers. So I took that side off first. Examining the workings I pretty much determined that yes – that piece was what was causing the problem.
But couldn’t get it back into it’s proper position without releasing the shutter…which I still couldn’t do from this side. So I screwed it back together and took the other side off instead.
Figured out the other shutter interlocks on that side…but still couldn’t release the shutter. Decided to put two and two together at that point. Took the other side back apart again so both sides were now bare…and manually triggered the safety while pressing the shutter…ca-chunk. It worked, the shutter released! Recocked the shutter…and pressed the shutter without manually overriding anything…ca-chunk – it worked again!
Put the sides back and and dry fired it a few more times…it works great! What’s more is I think I know how it happened. I think that if you cock the shutter while holding the lens release back this could happen. I didn’t test it while I had the sides off…but I’m going to avoid doing that just to be safe 😀
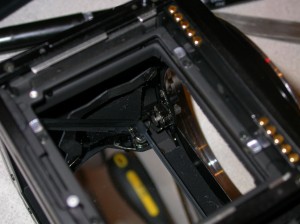
So here’s the guts of my now repaired camera:
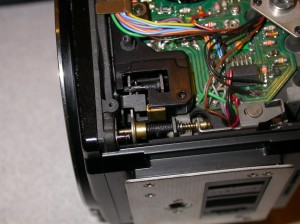
That was where I found the problem. The little round thing with the spring around it is part of the lens release. There’s a little lever that’s supposed to be captured by the groove on that deal. It was behind it instead. This is after I fixed it so you can’t really see the lever that was misplaced.
This was the sideview of the problem area. The lever that was misplaced is attached to the brass bar near the bottom. The entire thing was supposed to be pushed more forward. Pushing the grey bit on the right towards the lens tricked the camera into thinking the film back was properly seated and the darkslide was removed. That should be the default position…but the lever was stuck against the round thing which kept it from returning to the default position. Pushing the grey bit forward was the key to releasing the shutter and allowing things to reset properly!
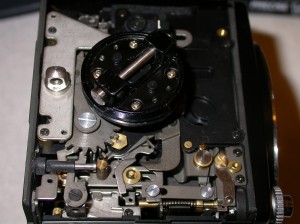
And this is the other side, the infamous winding mechanism which is apparently one of the first things to go on these cameras. Figuring out how the shutter release worked from here helped me figure out how to solve the problem. But I now know the problem could have been solved entirely from the other side. Still neat that I got to see this.
So – I now have two working ETRS bodies. I’ll probably keep this one and re-sell the KEH one…or I may keep it as a spare. We’ll have to see what happens!
01
Sep 08
Busy weekend
It’s been a weekend that could have easily supported a blog post a day. But I’m lazy and I really was hoping to get a new photo or two printed before posting…but other things happened and I still haven’t made any new prints. So here’s the updates instead!
This one will be long with a lot of photos…no teaser photo for the front though.


