Amy and I have known it was coming. From the day we moved in we dreaded it but we knew it was unavoidable…sooner or later we were going to lock ourselves out of the house. The issue is the style of lock. On the house we were renting they were pop-locks where they would unlock anytime you opened them from the inside. On this house they’re twist locks that stay the way they were last set. So whereas before we knew that the act of stepping out of the house would unlock it – now if we step out while it’s locked it stays locked.
new house
19
Feb 08
Untitled
So let’s see how well picasa does at posting large panos
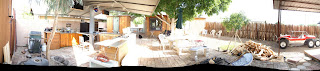

This is the stitched version of the shot I took before our big housewarming / Amy Bithday party. Exposure isn’t that good…and I didn’t keep the camera very level…but it does give a decent overview of the kitchen half of our backyard. The fence along the right is the one Psammy keeps injuring herself on.

18
Feb 08
More painting
Ok, the cell phone didn’t do a very good job earlier…and now I know that even a good camera isn’t going to make this very easy. Until I dig out one of my grey cards It’s going to be up to you to use your imagination as to how our living room looks. Despite knowing the temperature of our light bulbs (I’ve put warm 2800k CFL’s into almost every fixture, the fan lights are off since they don’t match) I still had a hard time getting the white ballance correct on my camera…and the JPG conversion – I need to find time to process the RAW’s to get these colors accurate. The first one is closest to reality – though the red isn’t really that intense. Even so we’ve decided on a replacement that is more in line with the existing green wall and this new blue.


BTW – when I worked in a one hour photo lab I used to HATE people who would bring in photos like this. If you never saw the scene it’s real hard to tell what the color should be like! The only mainipulation on these photos was done entirely in-camera. The poor camera in this case is faced with the same issues I had to deal with manually choosing color corrections for a roll of film that I had no baseline for. It’s a lot easier to fix now with photoshop than it was with heavy correction filters and multiple attempts (each wasting paper and chemicals) but it’s still tough to make the final call.
When we get the new red and re-paint I’ll take some better full living room shots to show off the changes. No photos of the 3rd bedroom yet…I dug in yesterday before Amy got home and with about 4 hours spent between the two of us it’s starting to take form. Still a mostly disorganized pile of boxes…but it’s about half as big of a pile as it was before! There are also 3 bookcases and 2 desks setup already.
I also have a project in the backyard that I’m working on. That will have to wait for another post. I’m experimenting with using Picasa to ease including photos…but I’m not big on it yet. I recently had to move my hitesman.com domain from the provier it had been with for over a decade to one of the servers I administrate for MGM Internet Solutions. I’ve been meaning to do it for some time and an e-mail issue finally gave me the excuse to pull the plug. Now I have much more control over my domain and will be able to persue some other ideas with it again. But until then it’s looking like Picassa is ok for using one or two photos…but add more than that and they may not come through. It’s also easy to mess up the alignment and the generated HTML is pretty gnarly (I need to cut and paste into my editor to see if some hilighting will make it more tolerable to read.) The backyard project will have quite a few photos and I don’t want to break it into THAT many posts…
18
Feb 08
Latest Crazy Project
So, a few weeks ago we finally got around to holding our housewarming party. I had my camera sitting at the ready in my office (which was pretty much centrally located for the festivities) but was so busy with other things I only really had one or two photos that I took!


I had taken a pano of the backyard before the party started…but I’ve been having some serious exposure issues with my camera lately and need to setup to tests to see if I’m crazy or if the camera is. It may just be that the dynamic range in my yard is way too much for the D7…I have a feeling it may be a lens issue though. Reminds me of a previous issue I had with one of my cameras…but that’s a whole different story. Maybe if I find my old film cameras while organizing the house I’ll talk about it. But it’s not the story for today the point right now is either I’ve completely forgotten how to meter a scene…or my camera isn’t really doing what it says it’s doing. Don’t rule out me completely forgetting about some setting I forgot I had changed in some special situation and just need to change back. This one frame from that series though showed a good “party mode” before photo of our designated bar. Here’s a little less “formal” (though the tap has now been polished) day to day view of it as I prepare to embark on my latest experiment:

The tap when up hours before the party after a few days of debating where it should go. With the tap in place the question became of course…how to keep the beer cold. For now we’re just using a bucket of ice with the 5gal homebrew keg sitting in it. It works…but I can’t leave the beer in place and have to move it to the fridge at the end of a party. But we do use that fridge for some things so having the beer take up space isn’t a permanant solution. I also don’t want to drill a hole (it’s a nice fridge), use the ice water inlet or any other modifications to the fridge.
So I figured why not use the space under the tap! This space isn’t used for much of anything right now other than as a bar at parties and storing coolers. The area on the left with the red grill on top does not open, it is open to the left side. The power outlet available just above the counter is shared with the fridge. I found what I believe to be a gas line capped off inside the cabinet under one of the temporary “floors” that the previous owner had set in it. The fridge seldom runs right now in the winter. I had a fridge in a Yuma garage and have several friends with outdoor or garage fridges, freezers and freezers converted into fridges. I have an idea what to expect if I’m going to turn this cabinet into something truely usefull for us.
I figured Amy would never go for it – but when I offered to build a wine rack into 1/3rd of the cabinet she becam very supportive! I did find some inspiration and potential validation that my idea could work and is worth pursuing. I figure as a first step I can just turn the cabinet into a large cooler and see how long it will keep a 5 gallon bucket of ice. Won’t cost too much and will still make it more useful. The space available is only 46 cubic feet – and it will probably be less since I’m planning an inch or two of insulation on top of the studs.

The construction of the existing cabinet is pretty good. It’s all at least as square as I could get it, pressure treated lumber was used for the ground contact and it’s on a nice flat slab (with water, gas and drain available). As well as being on a slab it’s up against a large brick wall. I’m not sure if this thermal mass behind and under it will help me or hurt me…this part of the wall is pretty much in constant shade and seems to stay consistently cool. But I haven’t been here for a summer yet and Yuma summers are INTENSE so there’s a good chance that all that thermal mass could work against me if the sun gets near it. The hole for the tap is very small. I will be enlarging it at some point so I can upgrade to a 3 or 4 tap tower – but that’s way down the road unless I find a screaming deal. The west wall (Left in the overview photos) is a solid board much like the north wall seen on the left here. The east wall is just slats however. The south wall (my worst for sun exposure) is the doors.
I’m going with a multiple layer approach to insulation to try and help deal with the extreme yuma summer temperatures. The first step is about half done. I also have supplies for the second and third layers. So far I have less invested than it cost for us to go bowling last Saturday but the big budget item will be a way of keeping this box cold once it’s insulated. I have some ideas there…but like the details on insulation they’ll have to wait for another day.
10
Feb 08
Untitled

Trying out the whole posting from a phone thing. This is a little snap from my cellphone of this weekends project. Unfortunately the cell phone camera completely destroys the whole point which was to show off the new paint colors in the living room. But due to the lousy color rendition in the cell phone the new blue wall looks like the old green color! The red is kind of far off as well.
So I guess I’ll have to break out the real camera for some comparison shots tomorrow.
Here’s the original view of the living room in the colors that were there when we moved in:
